Creating your first Joomla! category with SEBLOD
 On the administrator menu, click on "Content", "Category Manager" then "Add New Category" .
Filling in the category form
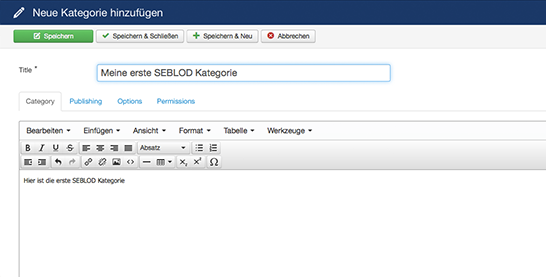 Now you can set a category title (for example: "My first SEBLOD Category"), set it to published, select a parent (or not) to this category and write a short description like
"This is my first SEBLOD Category". Click on "save & close" after finishing your configuration.
Now you can set a category title (for example: "My first SEBLOD Category"), set it to published, select a parent (or not) to this category and write a short description like
"This is my first SEBLOD Category". Click on "save & close" after finishing your configuration.
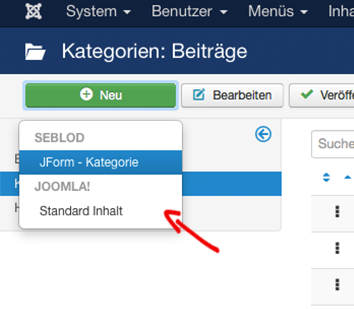
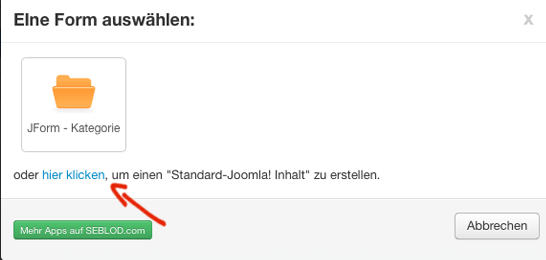
 On this screen, to create a "standard Joomla! category", you can click on the green "new" button and a pop-up will appear. In this pop-up, click on the "click here" link.
The integration of SEBLOD with Joomla!
 The creation of categories with SEBLOD is
seamlessly integrated with Joomla! category manager. Look at how this
integration works.
The creation of categories with SEBLOD is
seamlessly integrated with Joomla! category manager. Look at how this
integration works.
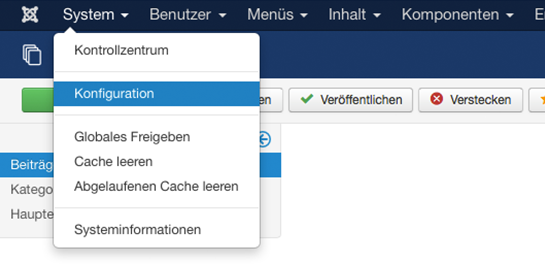
Click on "System" then "Global Configuration" menu links.
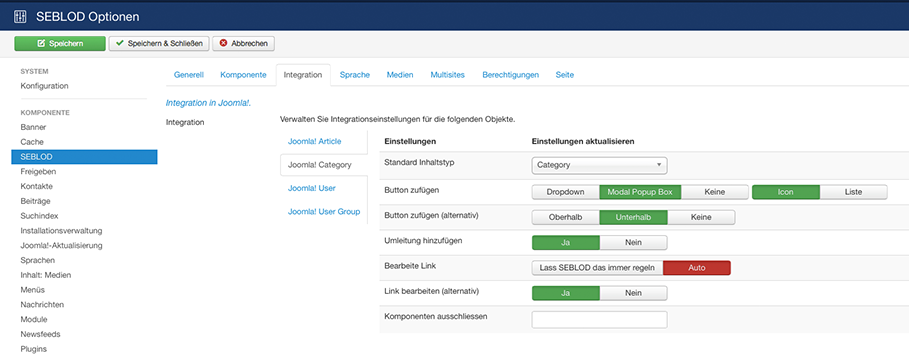
Add Button:
 select
"Dropdown" option to have a list under "new" button in the "Category Manager" when you click on it
select
"Dropdown" option to have a list under "new" button in the "Category Manager" when you click on it
 Select "List" option to have "Category" item as you can see in the image.
Add Button (Alternative)
This option changes the positioning of the "or click here to create a Standard Joomla! Content" text when creating a category. Select "above" or "below" options to keep the option of creating a category with the native Joomla! form. Select "none" to remove this text completely.Redirection
This option adjusts which form you will get by default when you click "New" in the "Category Manager". Select "Yes" to have the SEBLOD form, select "No" to get the Joomla! form by default.Edit Link and Edit Link (Alternative)
These options are discussed in the tutorial "Editing a SEBLOD Category".Erstellen Sie Ihre erste Joomla! Kategorie mit Hilfe von SEBLOD
Klicken Sie im Hauptmenü auf Inhalt > Kategorien und anschließend auf "Neue Kategorie".
Befüllung des Kategorie Formulars
Füllen Sie den Kategorien Titel mit zum Beispiel "Meine erste SEBLOD Kategorie" aus und setzen Sie diese auf „veröffentlicht“. Wenn Sie möchten, können Sie eine übergeordnete Kategorie auswählen und eine kurze Beschreibung wie z.B. "Das ist meine erste SEBLOD Kategorie " hinzufügen. Klicken Sie danach auf "Speichern und schließen".
 Sie können immer noch Standard Joomla! Kategorien erstellen.
 Klicken Sie dafür auf "Inhalt" -> „Kategorien“. Sie sehen alle dort alle erstellten Kategorien.
Um eine Standard Kategorie zu erstellen, klicken Sie hier auf die grüne Schaltfläche „NEU“ und es erscheint ein Popup. In diesem Popup klicken Sie auf „hier klicken um eine Standard Kategorie zu erstellen“
Integration von SEBLOD mit Joomla!
 Die Erstellung von Kategorien mit SEBLOD ist nahtlos in Joomla integriert.
Kategorien Manager. Hier zeigen wir Ihnen, wie diese Integration funktioniert.
Klicken Sie auf "System", dann auf "Konfiguration".
Für die Erstellung von Kategorien haben Sie folgende Einstellungsmöglichkeiten:"Button zufügen":
wählen Sie „Dropdown“ um eine Liste unter dem „Neu“ Button im Kategorien Manager zu erhalten wenn Sie darauf klicken.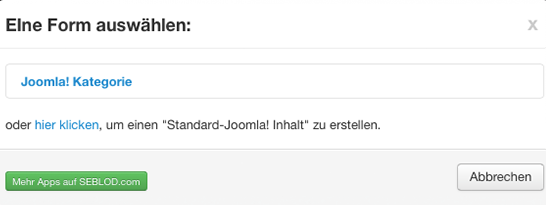 Wählen Sie Liste“ um das Popup so einzustellen wie auf diesem Bild.
"Button zufügen (alternativ)"
Diese Option ändert die Position des „oder klicken Sie hier um eine Standard Joomla Kategorie“ zu erstellen text. Wählen Sie Oben oder Unten um die Möglichkeit einen Nativen Joomla Kategorie zu erstellen zu bewahren. Wählen Sie „none“ um diese Option komplett auszublenden.Umleitung hinzufügen
Diese Option stellt ein, welches Formular als Standard verwendet wird, wenn Sie im Kategorien Manager auf Neu klicken. Wählen Sie Ja um das SEBLOD Formular zu erhalten und „Nein“ um das Native Joomla System standardmäßig zu nutzen."Bearbeite Link" und eine "Link bearbeiten (alternativ)"
Diese Möglichkeiten beschreiben wir im Tutorial „eine SEBLOD Kategorie bearbeiten“übersetzt von: Elisa Sophia Foltyn
Ich bin Dipl. Kommunikationswirtin und ambitionierte Mediengestalterin für Digital- und Printmedien. Basis meiner Arbeit ist die Entwicklung von individuellen Kommunikations- und Designkonzepten und die anschließende Realisierung. Ich beschäftige mich seit 2006 mit Joomla! - In den Anfängen nutzte ich die Komponente K2 als CCK für die Umsetzung von Kundenprojekten die einen spezifischen Funktionsumfang verlangten. Durch einen befreundeten Programmierer lernte ich schließlich 2011 SEBLOD kennen und lieben. Einerseits kann ich mit SEBLOD meinen Kunden eine einfachere Eingabemöglichkeit für Inhalte bieten, auf der anderen Seite gibt SEBLOD mir die Möglichkeit leistungsstarke Applikationen ohne große Programmieraufwände zu erstellen.
Vous avez créé vos premiers articles et vous souhaitez les organiser. Dans cet article, nous allons créer notre première catégorie Joomla! avec SEBLOD.
Création de votre première catégorie Joomla! avec SEBLOD
Dans le menu administrateur, cliquez sur "content", "Category Manager" puis sur "Add New Category".
L’interface qui apparaît est le formulaire SEBLOD pour ajouter une catégorie Joomla!
Remplir le formulaire de catégories
Maintenant, vous pouvez définir un titre de catégorie (par exemple: "Ma première catégorie SEBLOD"), choisir de la publier, sélectionner un parent (ou non) à cette catégorie et écrire une courte description comme «Ceci est ma première catégorie SEBLOD". Cliquez sur "save & close" après avoir terminé votre configuration.
Vous pouvez toujours créer une catégorie standard de Joomla!. Pour cela, cliquez sur "content", puis sur le lien de menu "Category manager". Vous voyez toutes les catégories créés.
Sur cet écran, pour créer un "standard Joomla! category", vous pouvez cliquer sur le bouton «new». Un pop-up apparaît. Dans ce pop-up, cliquez sur le lien "click here".
L'intégration de SEBLOD dans Joomla!
La création de catégories avec SEBLOD est intégrée de façon homogène avec le gestionnaire de catégories Joomla!. Regardez comment cette intégration fonctionne.
Cliquez sur "System" puis sur le lien de menu "Global Configuration".
Sur le côté droit, sous "COMPONENT", cliquez sur "SEBLOD", puis sur le panneau "Integration".
Pour gérer la création de catégories, vous avez les paramètres :
Add Button:
Sélectionnez l’option "Dropdown" pour avoir une liste sous le bouton "new" dans "category manager" quand vous cliquez dessus.
sélectionnez l’option "Icon" pour avoir l’objet "Category" comme vous pouvez le voir sur cette image.
Sélectionnez l’option "List" pour avoir l’objet "Category" comme vous pouvez le voir sur cette image.
Add Button (Alternative)
Cette option change le positionnement du texte "or click here to create a Standard Joomla! Content" lors de la création d'une catégorie. Sélectionnez les options "above" ou "below" pour garder la possibilité de créer une catégorie avec le formulaire natif de Joomla!. Sélectionnez "none" pour supprimer complètement ce texte.
Redirection
Cette option permet de définir quel formulaire vous obtiendrez par défaut lorsque vous cliquez sur "New" dans "Category Manager". Sélectionnez "Yes" pour avoir le formulaire SEBLOD, sélectionnez "No" pour obtenir le formulaire Joomla! par défaut.