Structure of a Joomla! category
 To show the structure of a Joomla! category, let click on "Content", "Category Manager" then "Add New Category".
 As you can see in this image, a Joomla! category is essentially (not only) composed of three main fields : "Title", "Parent" and a "Wysiwyg" (acronym for What You See is What You Get) to add description.
Look at how we will customize this structure by adding three custom fields.
How SEBLOD manages a form of Joomla! category
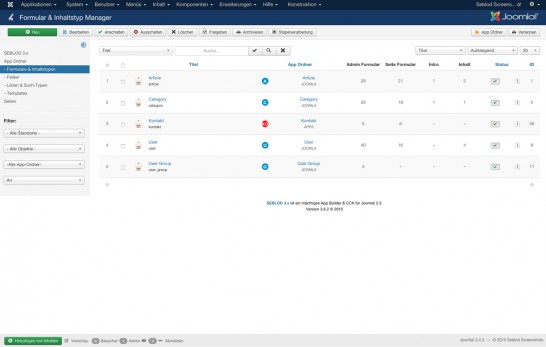
To see the structure of this content type, you can:
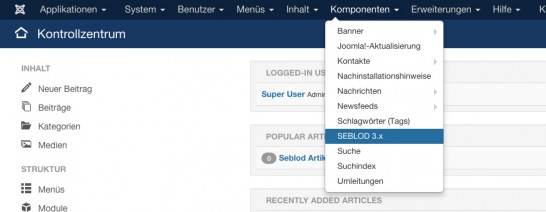
 click on admin menu link "Components" then "SEBLOD 3.x".
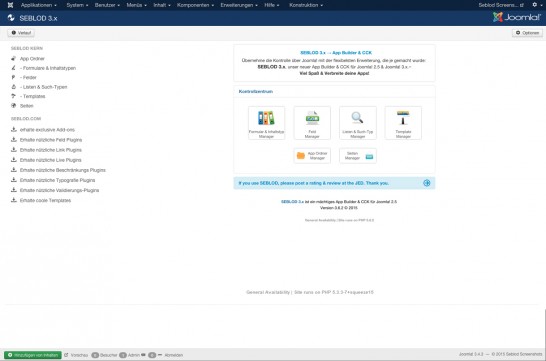
 The control panel of SEBLOD appears. You should click then on icon "Forms & Content Type",
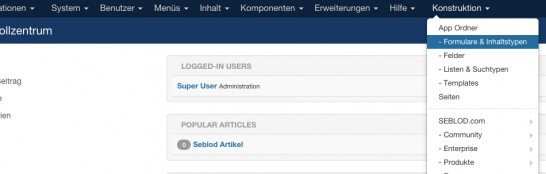
 click on admin menu link "Construction" then "Forms & Content Types".
 In the "Form & Content Type Manager", you should click on the item "Category"
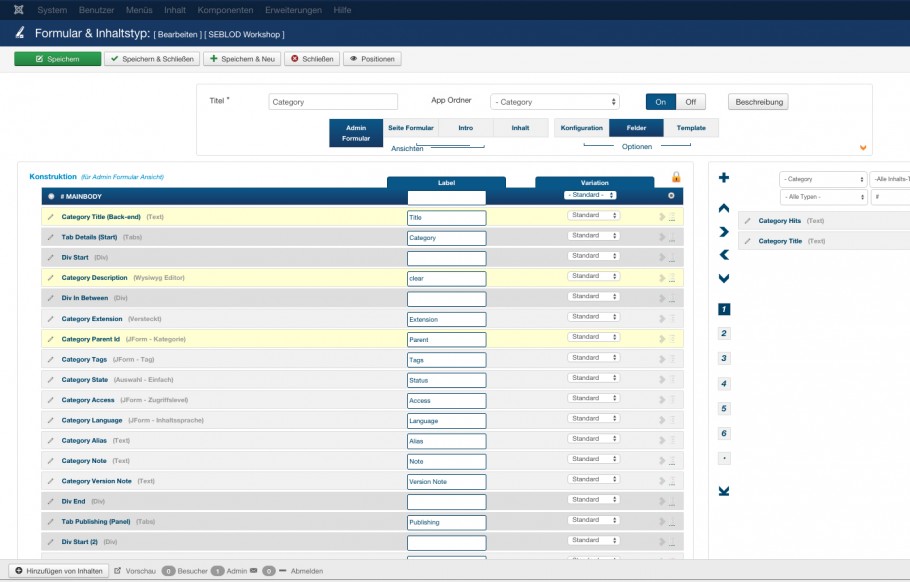
So, we have the correspondences between:
- SEBLOD field "Category Title" and the form field "Title"
- SEBLOD field "Category Parent" and the form field "Parent"
- SEBLOD field "Category Description" and the form field "Description".

Let's look at how to add 3 custom fields to the content type "Category".
Add 3 custom fields, the process

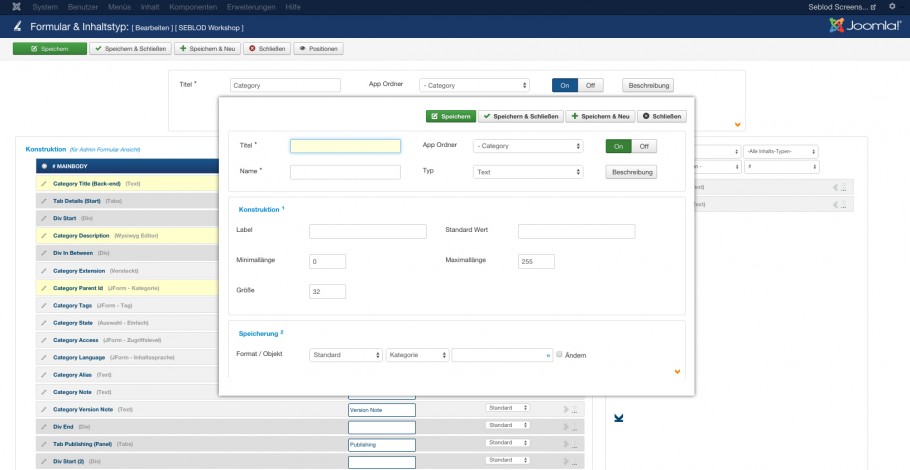
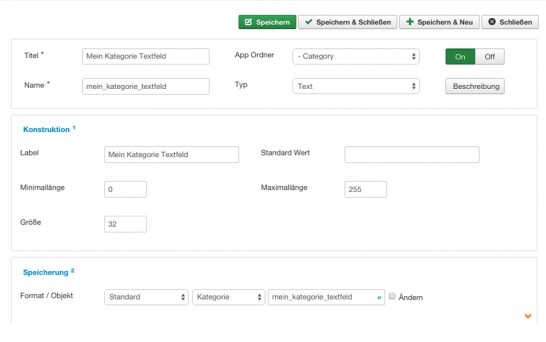
Adding a Text field
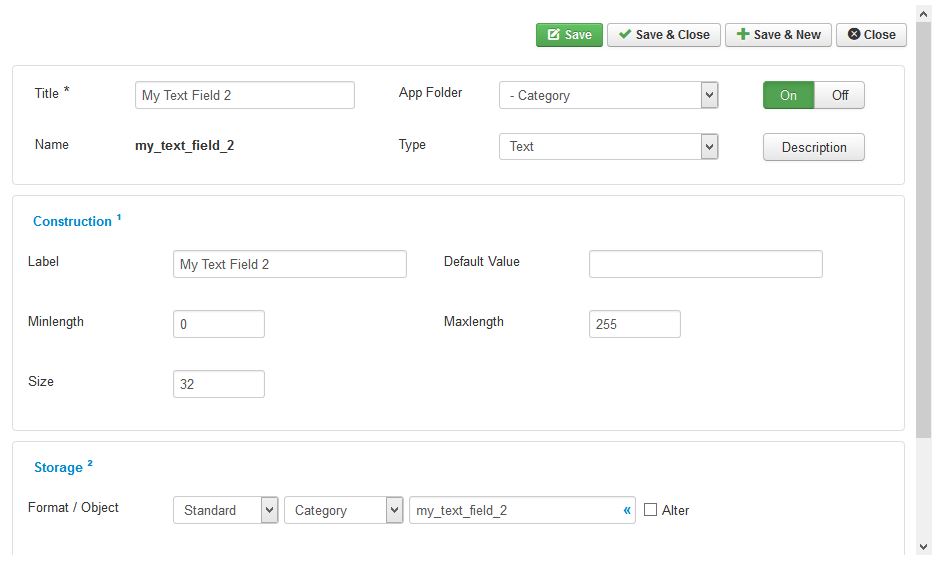 To add a "Text" field to the "Category" content type:
- set a field "Title", for example "My Text Field"
- set a field "Label", for example "My Text Field"
- select a field "Type": of course a "Text" option of the Type setting
- click on button "Save & New" to add the next field.
Adding a "Select Simple" (Dropdown) field
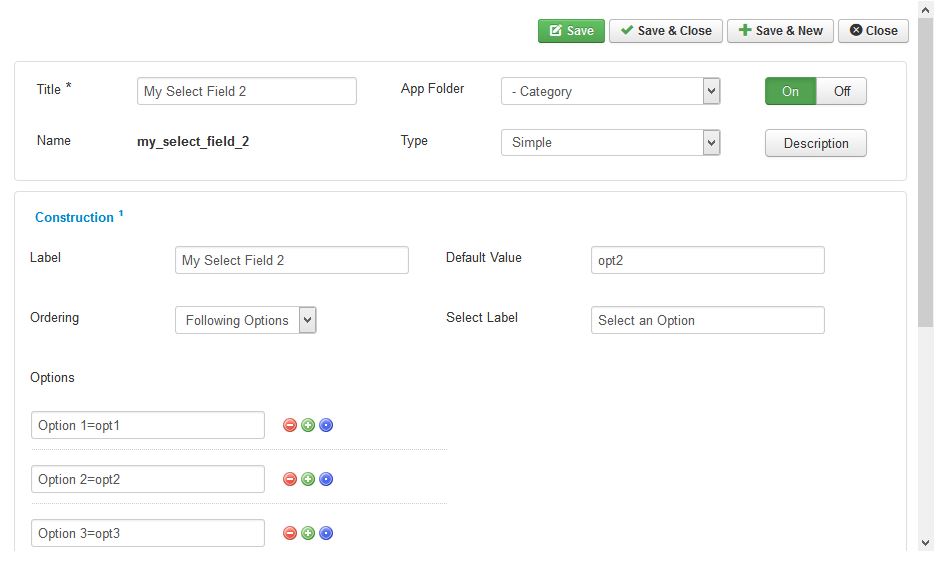 To add a "Select Simple" field to the "Category" content type:
- set a field "Title", for example "My Dropdown Field"
- set a field "Label", for example "My Dropdown Field"
- select a field "Type": of course a "Select Simple" option of the Type setting
- set "options" to this "Select Simple" field: for example "Option 1=opt1", "Option 2=opt2" and "Option 3=opt3" options. The text before the = is the text that will display in the select options. The text after the = is the value that will be stored in the database.
- click on button "Save & New" to add the next field.
Adding a Radio field
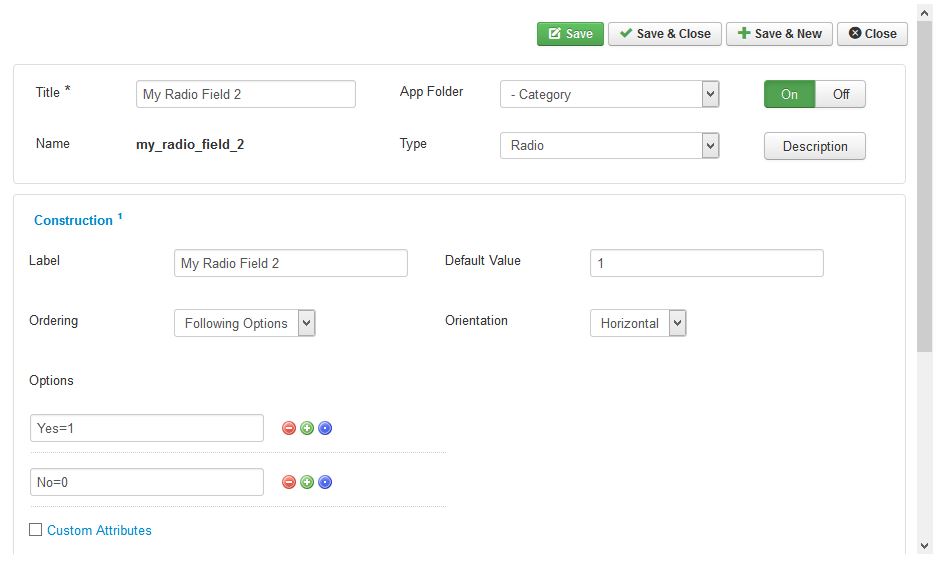 To add a Radio field to the "Category" content type:
- set a field "Title", for example "My Radio Field"
- set a field "Label", for example "My Radio Field"
- select a field "Type": of course a "Radio" option of the Type setting
- set "options" to this "Radio" field: for example "Yes=1" and "No=0" options. The text before the = is the text that will display next to the radio buttons. The text after the = is the value that will be stored in the database.
- click on button "Save & Close".
Result after adding fields
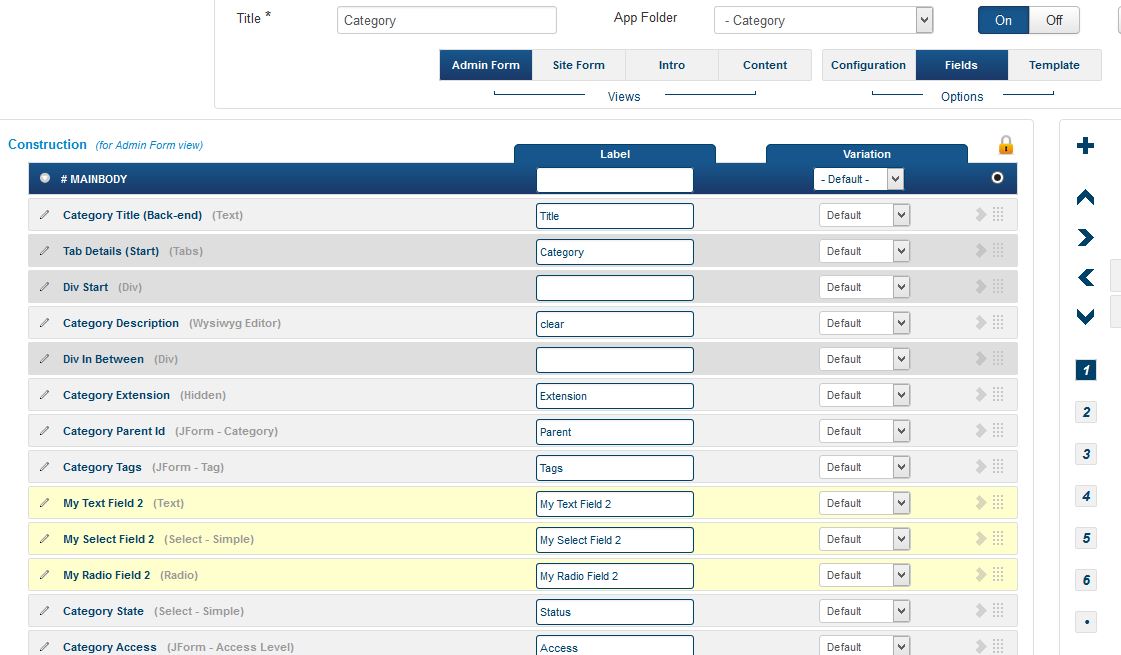
After clicking "save and close" your new fields will be available in your Category form beneath the tags field.
In diesem Beitrag beschreiben wir, wie Sie eine Joomla! Kategorie an Ihre Bedürfnisse anpassen. Als Beispiel fügen wir drei benutzerdefinierte Felder hinzu.
Die Struktur einer Joomla! Kategorie
 Sehen Sie sich zunächst die Struktur einer Joomla! Kategorie an. Klicken Sie im Joomla! Adminmenü auf "Kategorien" > "Neue Kategorie"
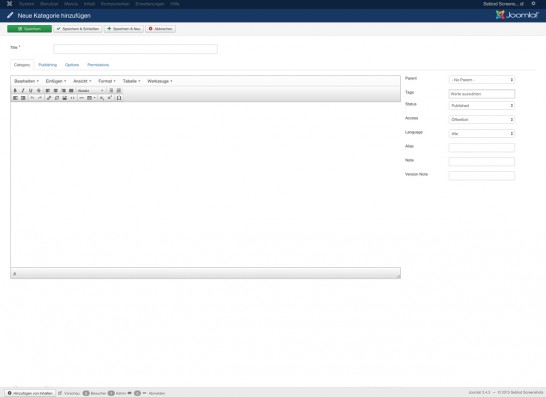
Wie Sie im Bild sehen, verfügt eine Joomla! Kategorie (nicht nur) über die Felder "Titel", "Übergeordnet" und Wysiwig (Abkürzung für What you see is what you get) um eine Beschreibung hinzuzufügen. Nun zeigen wir, wie Sie die Struktur an Ihre Bedürfnisse anpassen können indem Sie drei eigene Eingabefelder hinzufügen.
So verwaltet SEBLOD eine Joomla! Kategorie
Das Eingabeformular, das wir uns gerade angesehen haben ist ein Inhaltstyp namens "Category".
Um die Struktur dieses Inhaltstypen näher zu betrachten gehen Sie wie folgt vor:
klicken Sie im Adminmenü auf "Komponenten" dann auf "SEBLOD 3.x"
erscheint das SEBLOD Kontrollzentrum. Klicken Sie jetzt auf "Formular & Inhaltstypen"
Oder klicken sie im Adminmenü auf "Konstruktion" und anschließend direkt auf "Formular & Inhaltstypen"
In der "Formular & Inhaltstypen Übersicht" klicken Sie auf "Category"
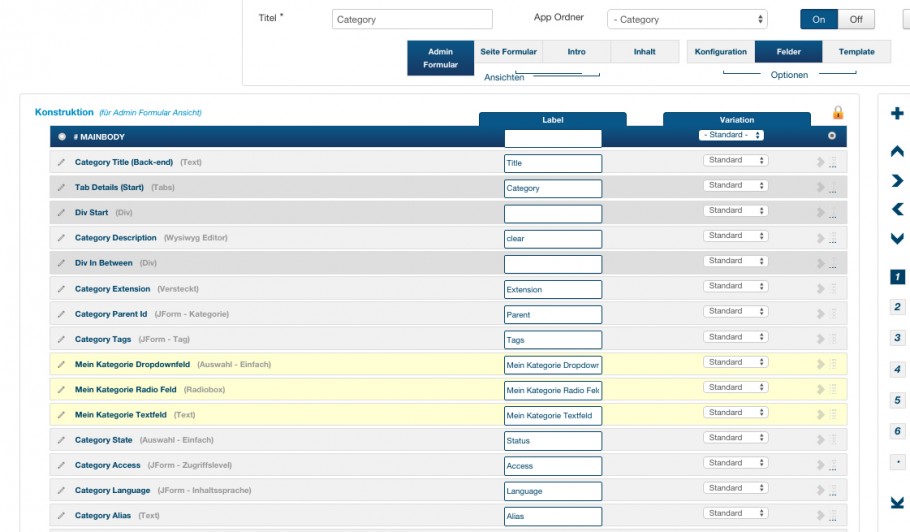
Wie Sie im Bild sehen, ist jedes Feld der Joomla Kategorieeingabemaske auf dieser Seite vertreten. Die wichtigsten Felder: Titel, Übergeordnet und Beschreibung Feld haben wir für das Bild gelb markiert.
Die Felder korrespondieren wie folgt miteinander:
- SEBLOD Feld "Category Title" und das Eingabefeld "Titel"
- SEBLOD Feld "Category Parent"und das Eingabefeld "Übergeordnet"
- SEBLOD Feld "Category Description" und das Eingabefeld "Beschreibung"
So fügen Sie nun drei benutzerdefinierte Felder in den Inhaltstyp "Category" ein.
Ablauf
Textfeld hinzufügen
"Text" Eingabefeld zum Inhaltstypen "Category" hinzufügen:
- Füllen Sie das Feld Titel aus -> zum Beispiel "Mein Kategorie Textfeld"
- Füllen Sie das Feld Beschriftung aus-> zum Beispiel "Mein Kategorie Textfeld"
- Wählen Sie eine Feldart, in diesem Fall "Text".
- Klicken Sie auf "Speichern und Neu" um das nächste Feld hinzuzufügen.
"Select Simple" (Dropdown) Feld hinzufügen
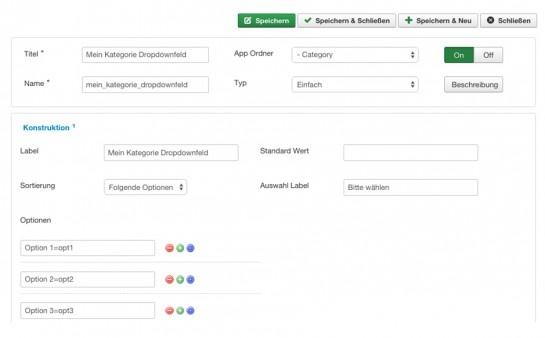
"Select Simple" Eingabefeld zum Inhaltstypen "Category" hinzufügen:
- Füllen Sie das Feld Titel aus -> zum Beispiel "Mein Kategorie Dropdownfeld"
- Füllen Sie das Feld Beschriftung aus-> zum Beispiel "Mein Kategorie Dropdownfeld"
- Wählen Sie eine Feldart, in diesem Fall "Select Simple".
- Setzen Sie die Optionen -> zum Beispiel "Option 1=opt1", "Option 2=opt2" und "Option 3=opt3". Der Text vor dem = ist der text der in den Auswahloptionen erscheint, der Text nach dem 0 ist der Wert, der in der Datenbank gespeichert wird.
- Klicken Sie auf "Speichern und Neu" um das nächste Feld hinzuzufügen.
"Radio" Feld hinzufügen
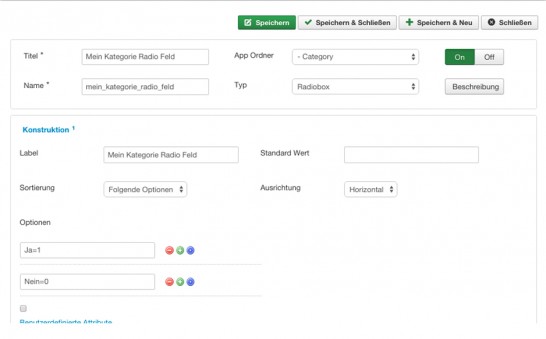
"Radio" Eingabefeld zum Inhaltstypen "Category" hinzufügen:
- Füllen Sie das Feld Titel aus -> zum Beispiel "Mein Kategorie Radiofeld"
- Füllen Sie das Feld Beschriftung aus-> zum Beispiel "Mein Kategorie Radiofeld"
- Wählen Sie eine Feldart, in diesem Fall "Radio".
- Setzen Sie die Optionen -> zum Beispiel "Ja=1" und "Nein=0". Der Text vor dem = ist der text der in den Auswahloptionen erscheint, der Text nach dem 0 ist der Wert, der in der Datenbank gespeichert wird.
- Klicken Sie auf "Speichern und schließen".
Ergebnis nach dem Hinzufügen der Felder
Wenn Sie nun den Inhaltstypen speichern und schließen und eine neue Kategorie hinzufügen, werden diese Felder unter den Tag-Eingabefeldern angezeigt.
Dans cet article, nous décrivons comment personnaliser une catégorie Joomla! en ajoutant 3 champs personnalisés.
Structure d'une catégorie Joomla!
Pour visualiser la structure d’une catégorie Joomla!,
cliquez sur "Content", "Category Manager" puis "Add
New Category".Comme vous pouvez le voir sur cette image, une catégorie Joomla!
est composée essentiellement (et pas seulement) de 3 champs principaux : "Title",
"Parent" et "Wysiwyg" (acronyme de "What You See is
What You Get" / ce que vous voyez est ce que vous avez) pour ajouter une
description.Regardez comment nous allons personnaliser cette structure en ajoutant 3 champs personnalisés.
Comment SEBLOD gère un formulaire de catégorie Joomla!
Le formulaire ci-après est en cours de construction par un "Content Type" appelé "Category".
Pour voir la structure de ce type de contenu, vous pouvez cliquer sur le lien de menu admin "Components", puis " SEBLOD 3.x".
Le
panneau de contrôle SEBLOD apparaît. Vous devez alors cliquer sur l'icône "Forms
& Content Type",cliquez
sur lien de menu admin "Construction", puis "Forms
& Content Types".Dans
"Form & Content Type Manager", vous devez cliquer sur l'élément
"Category"Comme vous pouvez le voir dans l'image ci-dessous, chaque champ de formulaire est présent sur le côté "Content Type". Les plus importantes: les champs titre, parent et description sont indiqués en jaune dans l'image.
Donc, nous avons les correspondances entre:
- Le champ SEBLOD " Category Title" et le champ de formulaire "Title"
- Le champ SEBLOD " Category Parent" et le champ de formulaire "Parent"
- Le champ SEBLOD " Category Description" et le champ de formulaire "Description".
Voyons comment ajouter 3 champs personnalisés au type de contenu "Category".
Ajouter 3 champs personnalisés, le processus
Pour ajouter 3 champs personnalisés au type de contenu "Category", cliquez sur le bouton "+" (le bouton "+" est situé à droite du bloc "Construction"). Un formulaire dans la fenêtre pop-up apparaît
Ajouter un champ Text
Pour ajouter un champ "Text" à un type de contenu "Category":
- définissez un champ "Title", par exemple "My Text Field"
- définissez un champ "Label", par exemple "My Text Field"
- sélectionnez un champ "Type": bien sûr une option "Text" du paramètre Type
- cliquez sur le bouton "Save & New" pour ajouter le champ suivant.
Ajouter un champ "Select Simple" (Dropdown)
Pour ajouter un champ "Select Simple" à un type de contenu "Category":
- définissez un champ "Title", par exemple "My Dropdown Field"
- définissez un champ "Label", par exemple "My Dropdown Field"
- sélectionnez un champ "Type": bien sûr une option "Select Simple" du paramètre Type
- définissez "Options" dans ce champ "Select Simple": par exemple "Option 1 = opt1", "Option 2 = opt2" et "Option 3 = OPT3". Le texte avant le signe = est le texte qui sera affiché dans les options choisies. Le texte après le signe = est la valeur qui sera stockée dans la base de données.
- cliquez sur le bouton "Save & New" pour ajouter le champ suivant.
Ajouter un champ Radio
Pour ajouter un champ Radio au type de contenu "Category":
- définissez un champ "Title", par exemple "My Radio Field"
- définissez un champ "Label", par exemple "My Radio Field"
- sélectionnez un champ "Type": bien sûr une option "Radio" du paramétrage Type
- définissez "Options" dans ce champ "Radio": par exemple "Yes = 1" et "No = 0". Le texte avant le signe = est le texte qui sera affiché à côté des boutons de radio. Le texte après le signe = est la valeur qui sera stockée dans la base de données.
- cliquez sur le bouton "Save & Close".
Résultat après l'ajout de champs
Après cet ajout, trois nouvelles lignes apparaissent dans le type de contenu "Category" (voir les 3 lignes jaunes dans l'image ci-dessous)
Après avoir cliqué sur "Save and Close" votre nouveau champ sera disponible sur le formulaire de catégorie sous le champ tags.