Enabling the SEBLOD User Bridge gives you advanced control over user profiles. It is particularly beneficial on community-style websites, or any site where you want to display profile pages for registered users.
User Account Creation WITHOUT SEBLOD User Bridge Enabled:
- Users can be created, edited, managed, using Form & List views.
- Any custom field can be added to User Profiles.
- This mode will suit most websites, and is the default setting on all Joomla + SEBLOD installations.
- Same features as "Without Bridge" + the following:
- Each time a User is created, an Article will also be added automatically, and both will be linked. The Article will bring a Content View for User's page/profile, will work with the SEBLOD Router, and will give "natively" much more control over the Lists (such as with fields like access, hits, publish_up, publish_down, etc.)
- You can define some values and how the title and profile URL is going to be generated.
I'd advise understanding how to change
SEBLOD User Integration with Joomla before going further. Information on this can be found in the Adding a Joomla! User Manual. Scroll down to about half-way down the page to the section titled "The integration of SEBLOD with Joomla!". This is particularly useful if you're using an entirely new SEBLOD content type to handle user accounts, as this will need to be set to the Default Content Type to work with the User Bridge.
How to Enable the SELBLOD User Bridge
 Go to the Joomla Extension Manager > Plugins and search for "CCK Storage Location - Joomla! User".
- Click on the "CCK Storage Location - Joomla! User" plugin
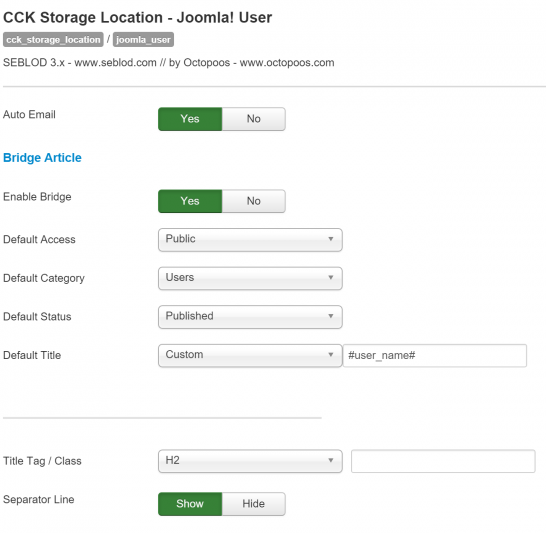
- You will then see the options of the SEBLOD User Bridge
- Auto Email: This will determine if the native Joomla notification emails will be sent when a user is created. If you want to override the core Joomla activation email with your own email trigger, set this to no.
- Enable Bridge: Yes will enable the bridge's functionality, No will disable it.
- Default Access: will determine what the access level of the linked profile article created when the user account is created. Setting this to "registered" will mean that only registered users of your site can view other users' profile pages.
- Default Category: will determine the category that the user' profile article will be placed in. Please ensure that the access permissions set on this category don't contradict / override your intended "default access" setting.
- Default Status: will determine the status (published / unpublished) of the profile article.
- Default Title: this option gives you control over how the profile article will be titled, and, in turn, how the profile URL's will be structured using the SEBLOD router. If you select "Custom" you can place any SEBLOD custom field from your User content type by entering it in the field that appears to the right with the syntax #field_name#. If you choose to leave setting as "Auto", the title (and the alias) will be: Joomla User - [ID] - usually this is only suitable if you don't display/use the title/alias on your website.
This parameter is only suitable if you don't really display/use the title/alias anywhere on your website. - Finally, the Title Tag / Class and Separator Line are options that will determine how the users' profile page will show the page title.